Menu Plan for the week

Another week, another menu…

This week, fondue beef was on special, and Khéna has been asking for fondue for a while now so that will definitely be a meal. In the fridge we still have Tofu so that also has become part of our meal plan. And then on Friday, I am going to be taking “not-school” portraits at Communidée, the homeschool resource center in Montreal, so I won’t be home and Simon will be home with the kids and will be cooking for them which means that we will be doing an easy meal that I don’t really have to plan…


So, here is my Menu plan for this week….

  • Fondue “chinoise” (chinese hot pot)
  • Submarine sandwiches
  • General Tso Tofu
  • Pizza
  • Steaks on the BBQ with roasted red peppers
  • Chicken Enchilada casserole
  • Roasted Veggies and Garlic bread
Some of our breakfasts and lunches:

Chicken and Dumpling soup

I had never had, or heard of Chicken and Dumpling soup until a few years ago when I was watching a show on the food network that made it look so good. It looked exactly like comfort food even though I hated soup.

Yes, not very long ago, I hated all soups.

There is something about being able to drink my food that didn’t appeal to me and honestly most of the soups that I had in my memory were not the best. It is not that I wanted to hate soup, I actually wanted the opposite, I knew it was easy to make, inexpensive and that I could probably like the taste if I made it myself… so I started making a few…

This is one of the first soups I made and to this day it is still a favourite in the household, especially with the kids.

It all starts with a chicken…

Chicken and dumpling soup is always a second meal for me… what I mean by that is that I will roast a chicken and use about half of it for super the night before in something like club sandwiches. I then strip off the rest of the meat and put it aside, and then store the bones and the juices from the roast chicken until the next day. One chicken, two meals. I might look like a lot of work and a lot of step but it really isn’t… it is actually an easy meal to make and each of the steps takes just a few minutes to prepare and the result is well worth it!

In the morning I start on the stock…

No measuring needed…

  • Heat a bit of olive oil in a large pot.
  • Chop an onion in quarters (no need to peel them) and throw them in
  • Add a few green onions if you have them also
  • Cut a head of garlic into two pieces horizontally and throw it in (again no peeling needed)
  • Break a few stalk of celery in half and throw those in
  • Same thing with a few carrots
  • Sprinkle a bit of coarse salt, freshly ground pepper and a bit of poultry seasoning. (sage, thyme, marjoram)
  • Let the veggies cook and caramelize a bit. It adds depth to the stock.
Veggies for broth
Add the chicken bones and then about 16 cups of water… or enough to cover everything.


Making chicken Broth

Let simmer for a few hours until reduced by almost half.

You will end up with a flavourful and rich and flavourful stock. Strain, and set aside.
Rich homemade Chicken broth
About an hour before starting the soup, it is time to make the dumplings.
  • 2 cups flour
  • 1 tbsp baking powder
  • 1 tsp salt
  • 4 green onions (chopped finely)
  • 1 cup buttermilk (or milk with 1 tsp of lemon juice) *I use almond milk
  • 2 eggs
Mix the flour, baking powder, salt and onions together in a bowl. In another bowl, mix the sour milk and eggs. Add the wet mixture to the dry and fold in slowly until just incorporated being very careful not to overmix. It will be lumpy and that is perfectly fine.

Place in the fridge for an hour.


To make the soup…

  • 2 tbsp olive oil
  • 2 tbsp butter
  • 2 carrots, finely diced
  • 2 stalks of celery, finely diced
  • 3 cloves of garlic (minced)
  • 1/4 cup flour
  • Chopped roasted chicken (about 2 cups… or half  chicken)
  • chicken broth (recipe above)
  • 2 tsp garlic powder
  • 1 tbsp poultry seasoning
  • 1 tsp salt (or to taste)
  • 1/2 tsp pepper
In a large pot, heat oil and butter. Add the veggies and cook until softened.
Carrots, celery and garlic cooking
Add the flour and let cook for a few minutes
added flour
Cup by cup add the broth. After about 5 cups are added, start waiting a bit between each next addition and add the garlic powder, salt, pepper and poultry seasoning. Add the rest of the broth and adjust the seasonings to taste. Add the chicken and let simmer for about 5 min.
The soup should be flavourful and slightly thick and creamy.
thick and creamy chicken soup
While the soup is simmering, take the dumpling batter  out of the fridge. It should resemble a thick pancake batter.
dumpling mix
Using two tablespoons (or an ice cream scoop) quickly add spoonfuls of the dumpling mix to the soup. (You want to go as fast as possible)
Then quickly cover and simmer for another 10-15 minutes… don’t uncover when cooking!
(the dumplings will rise to the top and will both boil and stream at the same time)
dumpling are done
(the result is a very light and fluffy dumpling)
light and fluffy
And that is it! it is ready to serve and be enjoyed…
 I have to say… It is so hard to take pictures of this soup.. it might not look that appealing on camera but it is the ultimate comfort food, full of flavour, full of goodness and the whole family loves it.
Chicken and Dumpling soup

Falafel with Taratoor sauce

I remember the first time I had Falafel. I was in high school and working at a veterinarian’s office for the summer and on my lunch break I would go to a little family run place called “Café Joe” that was a few blocks away. They made the most amazing Falafel from scratch and I remember just loving the texture and taste. It was crispy and fried but tasted fresh and light. When I stopped working there and went back to school I would go out of my way to visit at times until one day I went by and they had sold the restaurant. When I left my mom’s and headed into my own place, I would buy those dry mixes to make falafel at home but it was never the same. It tasted… well.. processed and from a box mix. However, a few years ago I found this recipe and have never looked back. This is the good stuff…  This is it.

This recipe calls for dried chickpeas… you really need to use dried chickpeas. Canned chickpeas just won’t work… the reason? not because it is snobbish,  but because the mix is actually made with uncooked soaked chickpeas. Cooking them (or using canned) will not result in the right texture or flavour. The down side to that is that you do have to think ahead.

So… for the Falafel…

  • 2 cups dried Chickpeas/Garbanzo beans  (soaked for 12-24 hours)
  • 1 medium onion
  • 2 -3 garlic cloves
  • 2 -3 slices bread
  • 2 tbsp parsley
  • 1/3 red pepper
  • 1 tsp salt
  • 1/2 tsp black pepper
  • 1 tsp cumin
  • 1 tsp oregano
  • 1/2 tsp red pepper flakes *optional
  • 1 tbsp flour
  • 1 tsp baking powder
  • 50 ml water
  • 1/2 tsp baking powder
  • 125 ml water
  • vegetable oil ( for deep-frying)
When your chickpeas have soaked long enough, drain and put in the food processor. Add onion, garlic, bread, parsley, and red sweet pepper. and process until mealy. Move to a bowl (or use the pulse mode on processor) and Add spices, flour,  2 tsp baking powder and water and mix well.
In a small dish mix the remaining baking powder and water. Dip your hands in the water and form balls of the chickpea mixture the size of walnuts.
Falafel
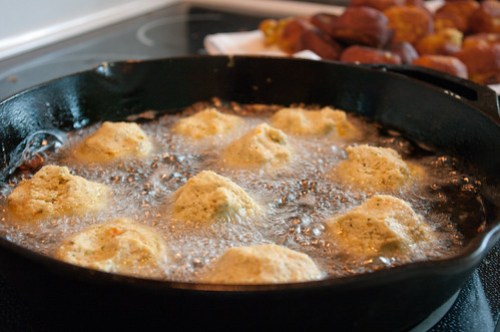
Deep fry in oil at medium high heat until golden brown.
Frying the Falafel
Crispy on the outside and soft and fresh tasting on the inside
Falafel
Serve on warm pita bread with Taratoor sauce (recipe below) and any other toppings you might enjoy (parsley, tomato, pickled turnips etc)…

For the Taratoor Sauce

  • 3/4 cup tahini
  • 1 garlic clove, crushed
  • Juice of 1 –  1 1/2 lemons
  • 1 cup water
  • 1/2 tsp salt
  • 3 tbsp finely chopped parsley
In a deep bowl beat the tahini with the crushed garlic and lemon juice until creamy. Add water bit by bit, beating well after each addition. If using blender / food processor put all the ingredients in and process until creamy. Add salt and parsley and stir. Taste and adjust. The sauce should have some tang to it not too lemony.
Yumm….
Falafel

Meal plan for the week

I keep on meaning to add this as a weekly post as every Saturday I sit down and plan our weekly meals before going grocery shopping…

For inspiration I ask the family what they feel like eating, I look at Foodgawker, check out the weekly specials, look at my own Recipe page or look over my meal ideas document on my computer. (I should share that one day 🙂 ) After the list is done, I make my grocery list and buy all that I need for the week… (you can read more about my process here)

So, here is my Menu plan for this week (I’ll be adding a few recipes this week also)

Some of our breakfasts and lunches:
Do you make weekly meal plan? What meal are you looking forward to eating this week?

Dehydrated Pumpkin

Did you know that I love my dehydrator? I mean really, truly love it?

We had a blast carving pumpkins at Hallow’een, but there was no way that I would let them go to waste. I mean, gnocchi, pumpkin cinnamon buns, pumpkin butter etc… How can I not make all of those?

However, pumpkin purée takes up so much space and I desperately need to unfrost my deep freezer. So I wondered… can I dehydrate it? Well… Of course I can!!!

cut the pumpkin in half and place it face down (or face up if it carved 😉 ) in a pan and bake at 350 until tender… (you can also do the same with any other squash)

Pumpkins ready to be baked

 (Xavier’s Pumpkin grew a chin in the oven…)

baked pumpkins

The peel will be very easy to just peel off… so do that and place the purée on your dehydrator tray and follow your dehydrator’s instructions for veggies.

The peel come off easilySpread on dehydrator tray

I found that the easiest way it to first put it on a non stick paper on the tray first and then when it is half way done flip it onto the tray so that it can dry completely. You don’t really have to do it, but If you skip this step it will stick inside the little holes of the tray and it will be time consuming to clean up…

dehydrated pumpkin

Tear the dehydrated purée into pieces and place in the blender and process…

into the blender


What you get is a crushed dehydrated pumpkin…

See that jar? That is actually 5 pumpkins worth 🙂

  dehydrated pumpkin5 pumpkins

To rehydrate, use 1/4 cup of powder with 1 cup of boiling water. Let sit and cool before using in a recipe 🙂

and don’t forget to do those seeds too!

dehydrated pumpkin seeds

Go to Top