Quilt progress…

I have been working on the Quilt each chance I get. It has changed design a few times but now I am really happy with the design I have in mind….

A few pieces are now pieced together with the sashing…

Blocks with Sashing

and my decision to try a dresden flower turned into a great center piece for the quilt…

Dresden Flower

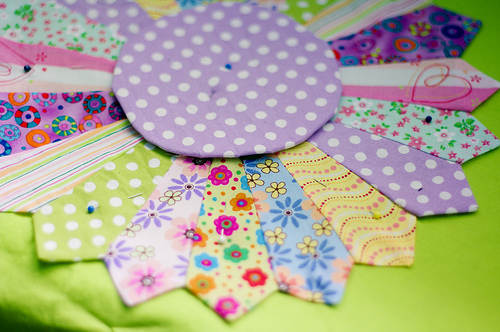
(it isn’t really that lopsided…. really!)

Centre piece for Quilt

I still have have a lot of work to do. but I am loving what I already have….

Beginnings of a Quilt…

When I was pregnant with Xavier I made him a very simple quilt… it was one of my first sewing projects… it was simple, it made from old clothes and second hand scraps, it was small, and it sparked a love for sewing.

First quilt back of my first quilt...

Surprisingly, I haven’t quilted since…

I have a lot of material in my sewing room including many 5″ squares that I had cut when I was making some kid dresses a few years ago. I was wondering what I could do with them when I just decided to have fun and experiment… so… I cut the squares into strips and randomly sewed the strips together to make new squares. I put them side to side and thought that they would make a great quilt just as they were….

then I came across this video on how to make an easy pinwheel…

and from that, my colourful striped squares became these…

Square

I put a border around each piece, put batting and a back and made a block that is 9 1/2″ square… and am in the process of making more…

Block

I am just doing it little by little, quilting each block as I go without much of a plan. It is a lot of work and I am not sure just what exactly I will end up with, but I am having so much doing it and the results are already inspiring…

Winter banner…

I have been wanting to get more into embroidering and I thought that this would be a great project.

Not only did I start, but Xavier also joined in and helped… So it has become something that we can share…

Xavier embroidering

almost done

These mitten shapes are all the sizes of their hands….

Mittens

It is a work in progress but there are enough to put up now and I will be adding more once in a while as I make them…

Winter Banner

Winter Banner

I love what it adds to the space.

One-wet Trainers (for EC) Tutorial

Wilhelmina has now been diaper-free and using one-wet trainers since she was about 5 months old. One-wet trainers are great, they are underwear with a bit of absorbency so that a miss doesn’t mean a mess. They are however quite expensive between 15$-20$ each. Because I can sew, I can’t justify buying them.

I made quite a few pairs before finding the perfect design for us and I am really happy with the ones that I now make. They stay up well, have no bulk, and fit and look like underwear.

The underwear itself is made from a stretchy knit fabric (I have even used old onsies) The Soaker has a layer of flannel, a layer of Zorb or another absorbant material and a layer of PUL. You also need braided elastic for the waist and fold-over elastic for the leg openings.

You can download my pattern here. (I don’t mind sharing, but please don’t use this to sell unless you buy a license which is at the end of the post) These fit Wilhelmina at 5 months and were still fitting at 18 months when we stopped using them…

First cut the pieces out… giving yourself a 1/2″ seam allowance around all sides except on the fold. (btw… If you want to make these bigger just add more seam allowance.)

Next cut out the pieces of the soaker. One flannel, one PUL and one of your absorbant material and then a smaller rectangle of the same to add a bit more absorbency without adding bulk.

(here is the flannel, I forgot to take a pic of the other pieces…sorry )


Sew the absorbent material together and add a few lines of stitches going across the middle. This makes it less stiff and contours the body more instead of the soaker sticking out…

Put the soaker together by placing the flannel on top and the layer of PUL (shiny side in) on the bottom and sew the pieces together (serge or do a zig zag stich around the edges)

Now that the soaker is done, it is time for the underwear.

Sew the three pieces together. (the largest part of the crotch piece fits onto the back piece)

Next is time to put the elastic in the leg holes.

(This is Fold-over elastic if you are wondering)

Fold the elastic over one end of the leghole edge and stich it down, then using a zigzag stich pull the elastic slightly while sewing it down the leghole edge.

It should look like this when done.

The do the same on the other side.

Next place the finished soaker on the underwear piece with the round part on the front of the underwear. Using a zigzag stich, sew it in.


Now the soaker is in…

With the right sides of the underwear together sew and/or serge the side edges.

Almost done!

Nov10_0355
Measure your little ones waist  and then subtract about 10% and cut the braided elastic to that length. (Wilhelmina’s waist is about 17 inches so I need about 15 inches)

With the underwear inside out, sew the elastic around the top edge. Again using a the zigzag stich, and stretching as you sew. (the ends of the elastic should meet or slightly overlap)

Nov10_0362

Finally, turn the underwear right side out, fold the elastic over and sew it down, stretching again as you sew.

Nov10_0369

Your done!

Nov10_0374

Nov10_0411

Hope you enjoy them as much as we do!!

___________________________________________

Not everyone can sew or has the time to do so, so if you want to make these One-wet trainers and sell them, you may purchase a license to do so.

-One Limited Commercial License = One pattern / tutorial

One License must be purchased for each person who makes or sells the tutorial / pattern (so if two people are making them for an etsy shop of craft fair, both must buy the license)

I still retain copyright on the tutorial / pattern itself.

Lastly, when selling or listing the item, design credit must be given to A hippie with a Minivan with a link to this site or pattern.

Also, if you wish you may send me the link to your shop so that I can send people to you!

By purchasing the license, you agree with the terms

Thank you! and happy sewing!

              20.00


DIY Babywearing coat

Oversized old coat….

Thrift store find...

New Babywearing Coat 🙂

Babywearing Coat

I have seen instructions online, but like many things, I like getting the idea and rolling with it my way. The main thing that I saw in other instructions was to buy a coat a size or two bigger and cut a panel out but not all the way down to the bottom.

My coat was a bit snug on me so cutting all the way down to the bottom and adding some material made it fit perfectly. It also gives more space for her growing…

So… my first step was to put Wilhelmina on my back and see where her head was… then draw a line on the coat were I thought it should be and check it in the mirror… The width of the opening was about 10 inches and then the panel extended all the way down to the bottom of the coat.

This is an important step: sew two parallel lines around the panel and cut between the lines so that the coat and stuffing and all the layers that may be in the coat remain intact.

This coat had a bottom drawstring and a waist drawstring, so that I could keep on using the drawstrings to cinch the bottom and waist, I sewed over the string at the back a few times to secure it. In the hole that the drawstring passed through in the bottom panel, I took out the cut string and replaced it with an elastic… That way there would be no air going up the back of the coat when it was done.

bottom elastic

In the opening that was on the coat at the top I put in a double layer of a thick ribbed knit (same as with the side panels) this small panel is just to make the opening warm and comfortable for Willa… It is about two inches high (folded) and sewed in and topstiched. I stretched it a bit while sewing so it closes the opening slightly so that there are no drafts that can get in…

Top of babywearing coat...


Now, working with just the panel itself that has been taken off the coat, I figured I needed about 4-5 inches of material on each side to make the pouch, so I cut out 4 pieces of ribbed knit, about 5 inches at the top and then tapering down to about 2 inches at the bottom. The length is a bit longer then the length of the panel (so that you can hem the bottom).

I then put 2 layers together and serged the edges, finished the bottom and lined them up with the bottom of the coat panel and sewed them to the sides of the panel and topstitched.

For the last piece (the top of the panel) I cut out another two pieces of the ribbed knit about the length of the panel + the width of the side panels… and about 5 inches high (so that it would end up about 2 inches when folded and sewed in) I serged the raw edge and then sewed it to the top of the panel, stretching it slightly as I sewed. Then I finished it by topstitching.

The last step was to sew the finished panel to the coat. Starting at the bottom, I sewed each side. The top part of course extended past the opening so I sewed it down and then folded it over and topstitched it so you could not see the rough edges.

I also added a elastic so the panel behind her neck would be more snug and again, protect from any drafts… it also helps keep her arms in the coat.

This is the finished back….

pouch of the coat...

The bottom and middle drawstrings are still usable from the pouch forward. The elastic at the bottom keeps out drafts and the top pocket is all warm and soft for Wilhelmina…

I just put her on my back in the carrier of my choice, slide the coat over both of us and we will stay warm together. This will definitely last for at least two winters of growth if not more…

Not bad for a 15$ thrift store find, about a .5 m of ribbed knit and about 3 hours of interrupted planning and sewing… 🙂

Go to Top