Luggage racks coming out!

I am very late in writing this post!

Before the cold got the best of us and snow covered the bus, we did some work getting the luggage racks/air conditioning vents out.

This is what we were working with. The luggage racks/vents on each side the whole length of the bus with the air conditioning units in the middle that blow the air into the vents.

Sept13-306

Every time I went into the bus I would stare at them wondering how they would come out. Many people said I should just grind the brackets and just cut them out but it was more complicated and more simple than that at the same time. See down the middle there? On top of the rack. There are air conditioning units that use the racks as a vent. So cutting it all out wouldn’t work well at that section and it would ruin the brackets which would be great to be able to re-use.

So I looked at it another way. How did they get them in?

I pulled out the bumper strip that went along on the top and then started to see how it was all connected.

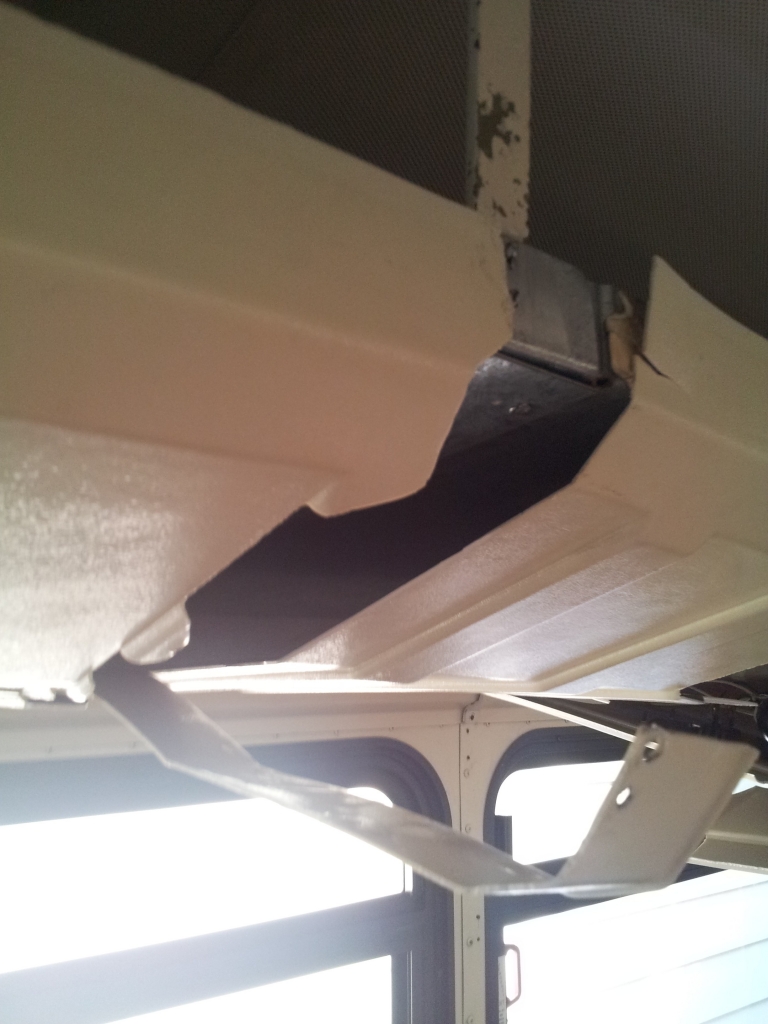
Rivets #1 were holding the shelf and the plastic together to the bracket. So those needed to be the first to go.

photo
These are Rivets #1…

20130930_130831

Once those rivets were out I took out the rivets that were holding the plastic at the joints. They could just be pulled out and snipped as needed and then I was able to start pulling and breaking the plastic vent cover. This stuff is sturdy plastic and it tore on a line but could easily span back and when it did it hurt. I had many scratches at the end from it.

20130930_143149
On this picture, you can see how I have ripped the plastic into strips. I took all of the vent covers off and popped the lights out of their sockets. They were all broken so I didn’t pay attention to trying to keep anything intact with the wires or lighting.
All of the front rivets are out and the whole shelf is being held by the back rivets and the rivets that hold the sections together.


20130930_143210

20130930_144343
After that I did the back rivets (Rivets #2). I started with the ones that were closest to where the shelves meet and not the ones at the end. If I were to work backwards, all of the weight would be disproportionate and it would make it harder. Once you get to the the rivets near the end. You need to either have someone close to hold the shelf and guide it down. (or make sure that the path is clear and do it yourself and be prepared to frighten everyone with the loud bang that makes people run out of the house to make sure you are still alive)

20130930_131117

Oh yes… Can you see that piece of carpet dangling on the other shelf in this next picture?
That is at the joint and you will need to pull and chisel it away to get to the rivets where the shelves meet. Then, with the shelf down, the middle of those rivets with be exposed and with the weight that is being put on them with the other shelf hanging, they will be easy to break by using a hammer and chisel.

oct13-169

Next you can take out the brackets by drilling into the rivets (#3 and #4 in the picture above).

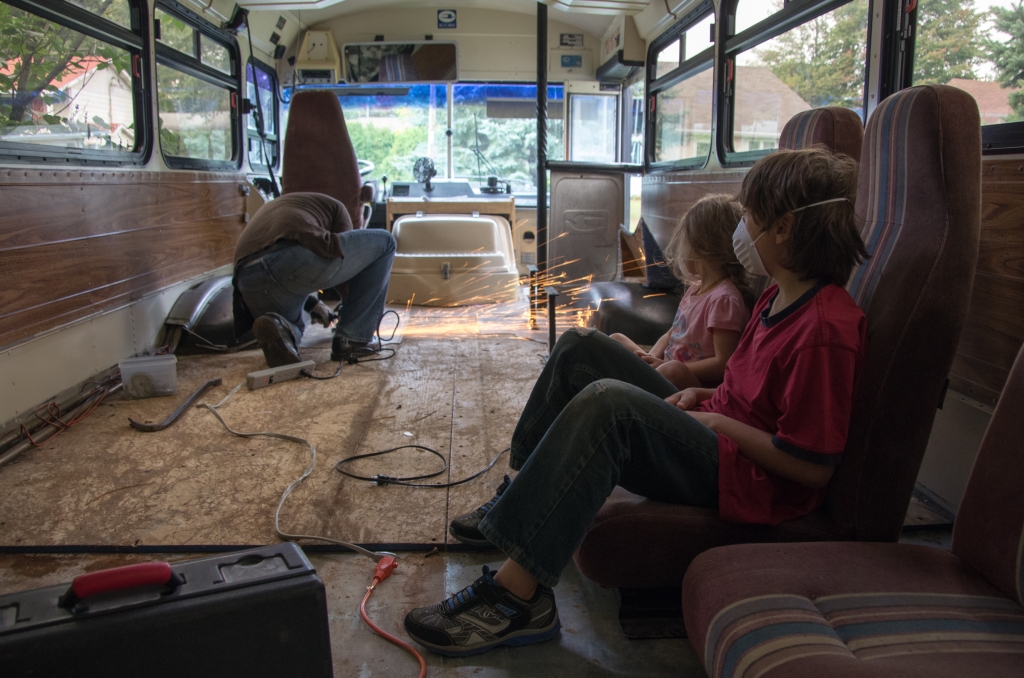
Make sure you are using a drill bit that is larger than the hole. That way you take the head off and the rivet is free. Xavier loved that he was able to do all them on his own. The only thing is that he quickly learned that even if it is hot, you need a long sleeve shirt to protect you from tiny pieces of burning metal.

oct13-168
T
his is basically the point where we stopped last year…

The only thing left up are the sections that house the air conditioners and that are not being held by brackets but by the air conditioner units themselves and we needed to find someone to empty the freon from them in order to continue. I finally found someone to do it after calling everywhere but now we just need to wait until there is a bit less snow.

Why don’t we keep them? One reason is that only one side was working. The second reason, is that they blow into the vents which we took off. They also take up a lot of space and can only be used when the bus is running. So there are no real positives in keeping them in there.

So next step:

  • Get the Freon taken out.
  • Take out the last section of vent and the units
  • Take the rest of the plywood off the floor
  • Clean up, fill the holes in the floor and put a rust treatment on the floor

Getting the last of the flooring out…

OK… well technically the last of the flooring is not out yet… but we are getting pretty close.

Sept13-310
To get the last of the plywood out we needed to get the the seat brackets out which meant grinding them. There was just no other way.

Simon had never used a grinder before us getting the bus, but by the end of getting these brackets out and all of the screws that were around the wheel wells that refused to come out any other way, he was becoming a pro.

Sept13-300

While Khéna and Xavier didn’t stick around much on the days that Simon was working, Colin and Wilhelmina were always by our side. It is not like the other two don’t like helping, they just have other things they like to do.

Sept13-285


Seat Bracket out… working on those darn screws!


Sept13-304

Now that the brackets and screws are all out, nothing is holding the plywood in place, we so the next step will be to lift it out.

More Flooring out…

Getting the floors out of the bus is not a small task, just like most of the things that we need to do on the bus. As show in my last post, the back of the bus had rotten plywood but the rest of the bus had plywood that looked almost new. I hurt my shoulder at one point last week so as Simon used the crowbar while I concentrated on the screws holding the plywood down on the metal.

Aug13-103-2

Some came up easy, some needed a little help, some made me go crazy and some were just impossible. Finally I found the best strategy.

  • Use the right bit. By this I mean, the biggest bit you have that fits.
  • Using the tork wrench, loosen the screw slightly
  • Use Jig-a-loo or another lubricant and spray the screw so that it can go under a bit.
  • Tap the screw with the hammer a few times.
  • Use the tork wrench or the power drill/screwdriver to get it out slowly work it out. If it doesn’t work tap it a few more times and go onto the next screw while the lubricant gets into it a bit. Then come back to it.

There were even a few that didn’t come out yesterday as much as I tried and pleaded but before heading inside I sprayed/tapped them one more time and in the morning they came out like butter.

Here are the floors with most of the flooring off. Each piece of plywood was held by about 20 screws…

Aug13-104

A friend came over today and lent a hand and helped us get most of the plywood out. the pieces in back were a bit rotten but not as much as the other day and it came off in pieces that can’t be reused but didn’t fall apart either.

After that, the rest came out slowly…  maneuvering around the wheel wells, the heaters and the thick layer of caulking that was still holding on for dear life.

Aug13-76

There were a few spots of rust after that back section but most of the floors look like new. A very good thing.

Aug13-84


We had to stop with the floor while we go the three remaining seats out and we will have to grind those brackets out, but it feels great to know that we almost have all of the floors out now.

Oh and see that sink? It was a garage sale find for 35$ with the faucet. It is nicer than the one in our house 🙂

Aug13-88

Next steps:

  • Grinding the seat bracket screws out
  • Getting the rest of the floor covering, screws and plywood out.
  • Getting the front rail and the separater that is behind the drivers seat out
  • filling the holes in the floor, using the wire brush on the rusty parts and then painting the floor with Rust-Oleum paint.

More of the floor…

So after seeing the floor in the back section I was nervous about the condition of the rest of the floor though I did have a feeling that it would be better. So today I started to rip up parts of the rubber floor starting with the centre aisle. Most of the screws were stripped so I used the pry bar on most of it one screw at a time.

I shared this picture yesterday but it shows what the back section looked like yesterday in the centre aisle… and the sides were worse

Rotten, moldy wood that smelled awful and was falling apart in our hands…

Aug13-62

and we had checked a small portion that was on the other side of the wall and saw that the wood was better but it still didn't look that great, especially the condition of the screws…

20130815_134119 20130815_134138

But then as I starting to pry the middle aisle rubber up I was able to grab a hold of it and start pulling and what was under is much more promising!

20130815_134300

The Plywood is in great condition. You can even read the stamp on it.

20130815_134602

Not only that, but the screws are also in great condition and I can take them out no problem!

20130815_143942

So, hopefully, I will not only be able to take them out easily but I will also most likely be able to reuse the plywood in most of the bus. I looked under a section of flooring that would have been at the feet of one of the rows of passengers and it also looks great. But not only that. As I was taking the floor off a few splinters came up with the glue and instead of the moldy stink that we had in the back and that was still lingering, It smelled like wood. And it actually changed the smell inside of the bus.

And of course, if the wood looks good, there are good chances that there will be little rust underneath also.

20130815_144150

Next step is to move the heaters out of the way and remove the seats to continue getting the floors out while salvaging as much wood as I can.


Inspection, plates and starting on the bus…

Buying a 20 year old, 40ft bus that you have never seen in person may be a bit nutty. Taking the train and driving it 900 km home without knowing if it was 100% mechanically sound (and running into problems) is quite nerve-wracking. Standing in front of said bus as you wait for an inspection to make sure that it is road worthy so you at least try to then get plates, could make your knees buckle a bit.

And that is where we were last week. Inspection and plates.

IMG_20130731_185702We can officially say that the bus is in great condition. There are a few little things that need to be done but the only three things that made it onto the inspection that we needed to get done right away were three lights. One burned out, one a bit rusty and needed new screws to be able to ground and the other a socket that needed to be replaced. That was it… big sigh of relief!
I followed the mechanic around and asked tons of questions. It is my nature, and though he seemed a bit off put at first he had no problem within a few minutes. As I am very visual so I get a lot out of having things pointed out so going to the mechanic is something I love to do and watch. One of the major things I wanted to know was how to adjust the air brakes which need to be checked once in a while. I had checked on Youtube but being under the bus and seeing it up close was exactly what I needed. As I waited for the inspection to be done the sun was going down and my nervousness shifted again to backing up in our driveway. This time in the dark. I did it though and now there are no more excuses to get to work.

The day after the inspection I headed to the SAAQ for the plates. This was another thing that was making me very nervous. Quebec makes it hard for you to change a title from bus to RV. To get it done you may need an inspection and you must have the following:

  • a kitchen that includes: a stove, refrigerator, counter, sink and table;
  • sleeping quarters that include: a hide-a-bed or bed;
  • a complete bathroom that includes: a bath or shower and a toilet with a permanent hook-up to a drainage system;
  • an electrical system that is independent of the vehicle’s motor;
  • a propane gas system with a certificate of installation compliance;
  • a potable water tank;
  • a sewage tank;
  • a water heater;
  • a heating system that is independent of the vehicle’s motor;
  • a minimum of two seats with seatbelts;
  • a number of seats with seat belts greater than or equal to the number of places to sleep (maximum nine).

http://www.saaq.gouv.qc.ca/en/road_safety/vehicles/converted_motorhomes/index.php

Of course… our bus has none of these. But the other problem is that we don’t want all of these either. The main thing that would make a problem is the sewage tank or black water tank. We want to have a composting toilet and that would have caused a problem because from what I have heard the inspectors don’t like it.

So, one of the big reasons that I bought a bus 900km away was that it was already titled as an RV. For me, that meant having a bit more freedom with what we want compared to what is “required” and encountering less problems and keeping the possibility open that we could simply use it to move if it came to that. However, after talking to the SAAQ a few times and talking with people,  I had doubts as I waited for my turn with all the documents in hand to get my plates. But, confusion by a new staff and a few strategically answered questions made the whole process go over quite smoothly and I walked away with my plates in hand. However, it is not yet on the road. Registration fees for a large vehicle is expensive!! Since I will not be driving it around for fun just yet and have a lot of work to do on it, I decided to keep it off-road. We have year for the inspection to be stil valid so I think that a year is a reasonable goal to get things done.

And so it has started. The first job is getting the back wall out. This bus was a military bus and the back section was for baggage and for weapons. The back wall is made of metal and like the rest of the bus, that means rivets. Oh my… I already hate rivets!

There are a few ways to get Rivets out… The first is to drill the center and then “pop” the head off… (when people say “pop the head off” don’t believe them… it involves a lot of banging and prying) I have seen a few videos that make it look much easier so I might be doing something wrong but these things are HARD!


Aug13-4 Aug13-8

Here are a few of the rivets that I have gotten off… still more than a thousand to go… yikes!!

Aug13-10

The second way to get rivets off is by grinding the head off or making an “X” with the grinder in the head of the rivet and though yes, it is faster. The grinder still scares me with all of those sparks. I have the protection (though I want to find a pair of coveralls) but the grinder is still scary.

The kids are also involved in the bus demo. Xavier has almost gotten all of the baggage hooks off and Colin has helped him and has also unscrewed many screws along with Khéna.

Aug13-12 Aug13-16 Aug13-19

Even Willa has been helping out!

Aug13-22-2

BTW… in the above picture you can see the tight fit in our driveway. We had to take the fence gate off because we are so close to the gate so that our car can also fit.

So, Our goal for the bus right now:

  • take out the wall (still have a couple of rivets and it will be done)
  • take out the luggage racks  (grinding the front posts then rivets)
  • take out the floors (there is a soft spot in the back that needs to be checked out)
  • take out the walls (more rivets)
  • Most likely take out the ceiling… (even more rivets)

Any tips for taking out rivets are appreciated!

Go to Top