It’s yarn!

Yesterday I decided to work on making a thinner single with that amazing northern Lights wool that I have. Once I had what I thought was enough (and ran out of what I had put aside for the purpose), I then decided on making a white single to ply with it.

I am so happy with the results!

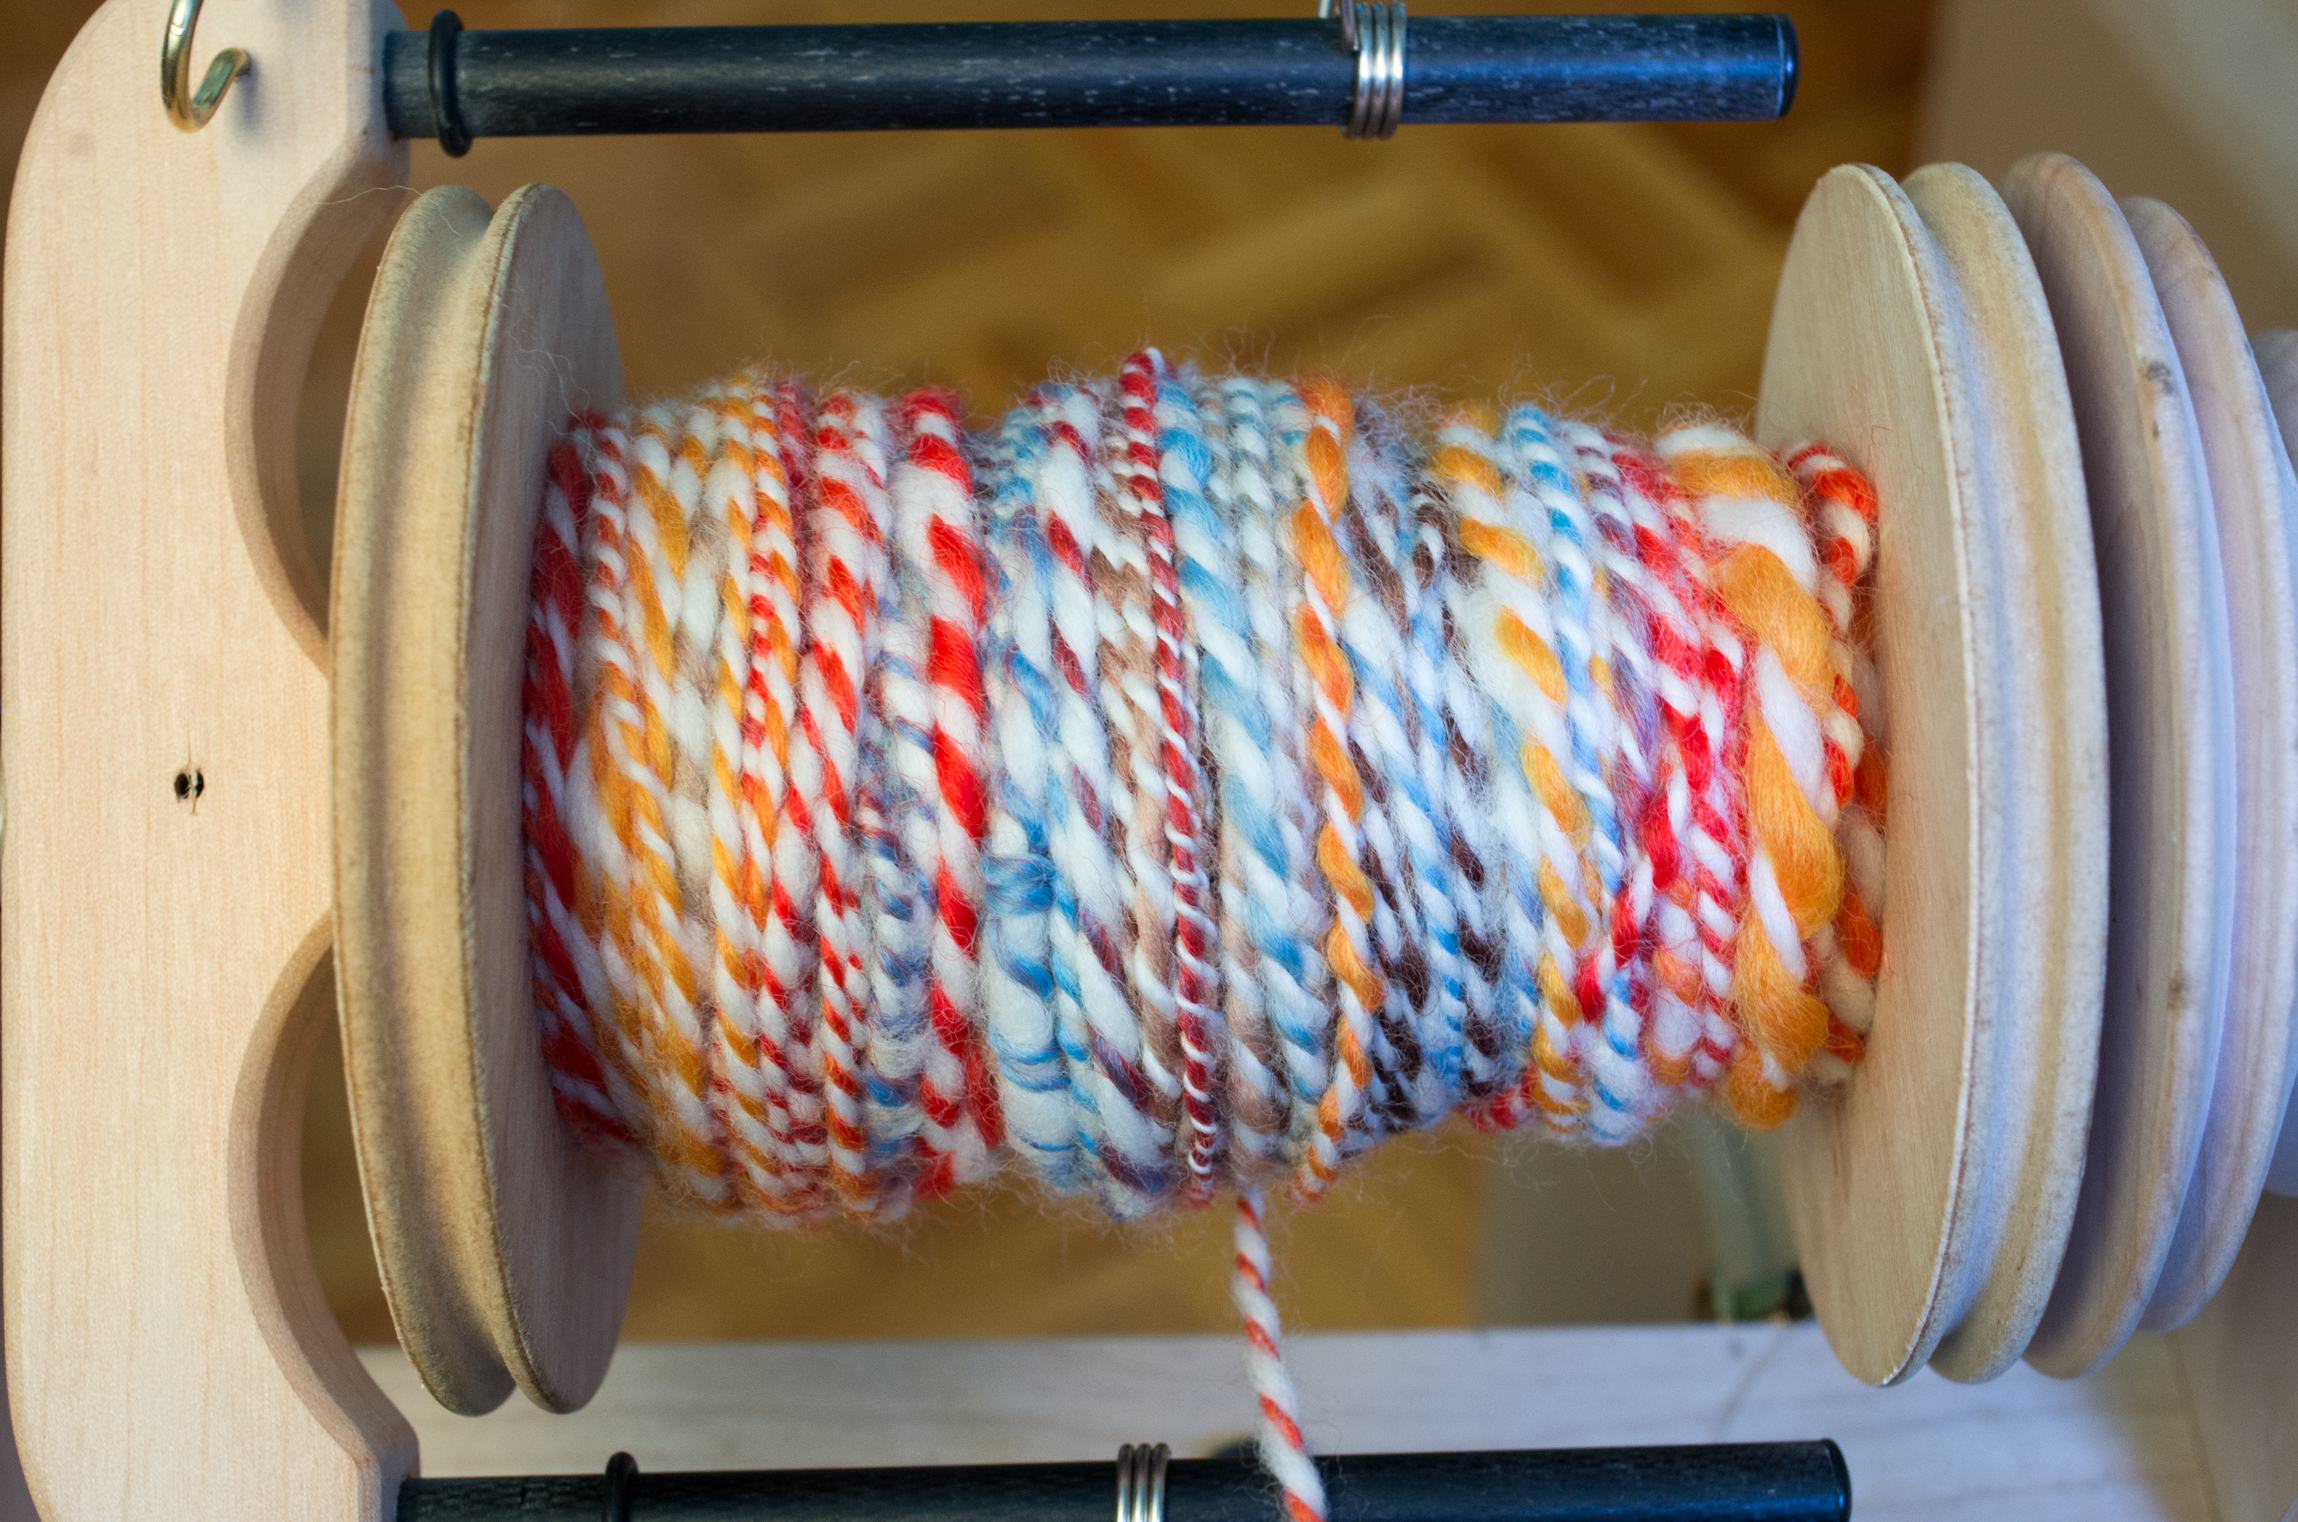
Here it is on the bobbin. At this point it was a little more than half full.

untitled-61-2

Here it is off the bobbin and onto the Niddy Noddy. If you don’t know what a niddy noddy is, it is a device used to make skeins and measure length…

So there it was… 88 yards (80 metres) of worsted weight yarn…. My first real usable yarn on my third day of spinning!

untitled-62

Isn’t it pretty?

untitled-63

untitled-64
This yarn and experience made me realize that this is not the wheel for me. Don’t get me wrong, it is a great wheel and easy to spin on, and has a lot of potential. but I can already feel its limitations down the road.

I had jumped on the chance to get it because it was not too expensive compared to the wheel that I really want, especially because I was having hesitations with a more expensive purchase not knowing if I would like spinning. But now that I know and I know what the other wheel could offer, I have decided to buy the other wheel and sell this one!

So I have a new wheel on the way! yay!

Anyone local (Near Montreal) want to buy a Like new Ashford Kiwi 2 for 300$?

Spinning….

I have wanted to learn how to spin for a while now. I have looked at wheels and spindles and I love getting new fibre for needle felting and always wonder what it would look like if it was spun. I narrowed my choice down to one wheel and saved up for it. I was just nearing the amount but then last week a found a wheel that was being sold locally that had only been used a couple of hours at most. I jumped on the chance right away and picked it up last friday.

untitled-61

It is not the wheel that I will ultimately want but it is a great starter wheel and I will be able to easily resell it once I want to upgrade which may be sooner rather than later.

With the extra money  I bought a bunch of new fibre and a blending board which will come in handy for both spinning and felting.

On Friday night I decided to use the longest staple length wool I had on hand which also happens to be the one that doesn’t felt very well and it a bit drab. But it got me started and I am pretty happy with the results.

March14-20
I was gone all day Saturday to give an EC workshop at Bummis and out for supper with some old friends but On Sunday morning I sat down at the wheel to try my hand at some soft Merino.  This is the blue I made….

untitled-41
Then I made a brownish rust colour and decided to try plying for the first time… It is a bit chunky at some places and a bit thin at others but it is yarn!!

untitled-43untitled-50

Next I decided to go for the gold…. I actually bought this wool to spin. Not felt. It is a Louet Northern Lights in Popsicle colourway and I loved it the moment I saw it. I spun it and then did my first try at a Navajo ply… I am so happy at the way it turned out!
untitled-58

My next goal is to get my yarn thinner.

I knew that I would enjoy spinning… I didn’t think I would enjoy it this much. I am already addicted!

Intro to the Bus!

Another forgotten post here… but it is never too late. I took this in the fall a couple of weeks before we stopped working on the bus…

New Blog Look!

As you may see there are some changes on my blog. Some are visual changes…. actually there are many are visual changes,  but the biggest change is in the back-end.

Screen Shot 2014-02-25 at 6.39.49 PM

Three installations of WordPress have now become one. Main page, Blog and Bus. All without changing each address.

It will be easier to keep up, more inviting for me to write, and it will hopefully be more user-friendly to explore and see everything that I have to offer.
I have to say, I am loving the look of it.

One of the main reasons that I had originally set things up the way I had been logistics since my blog has always been at /blog which in turn would have severed many of my links or made things harder to change if I would have changed the folder or address.  There are still some kinks to work out with a few broken links and images but everything is slowly being taken care of when I find the issues. I have updated my feed also and hopefully everything is working on that end also.

The other issue was that I wanted  to keep myself open to the potential of advertising on my bus page if I wanted to go that way without ever have ads on my Blog. It has always been important for me to have an ad free blog but I think that I will be able to work things out so that any advertizing would only be on the bus pages leaving the rest ad free. I can always work something out later if it came to that, but I love being able to post on my blog and my bus page at the same time, but have only the bus posts on the bus page.

I would love to have your opinion of the look and how things work,  and if you find any little problems please tell me!!

Luggage racks coming out!

I am very late in writing this post!

Before the cold got the best of us and snow covered the bus, we did some work getting the luggage racks/air conditioning vents out.

This is what we were working with. The luggage racks/vents on each side the whole length of the bus with the air conditioning units in the middle that blow the air into the vents.

Sept13-306

Every time I went into the bus I would stare at them wondering how they would come out. Many people said I should just grind the brackets and just cut them out but it was more complicated and more simple than that at the same time. See down the middle there? On top of the rack. There are air conditioning units that use the racks as a vent. So cutting it all out wouldn’t work well at that section and it would ruin the brackets which would be great to be able to re-use.

So I looked at it another way. How did they get them in?

I pulled out the bumper strip that went along on the top and then started to see how it was all connected.

Rivets #1 were holding the shelf and the plastic together to the bracket. So those needed to be the first to go.

photo
These are Rivets #1…

20130930_130831

Once those rivets were out I took out the rivets that were holding the plastic at the joints. They could just be pulled out and snipped as needed and then I was able to start pulling and breaking the plastic vent cover. This stuff is sturdy plastic and it tore on a line but could easily span back and when it did it hurt. I had many scratches at the end from it.

20130930_143149
On this picture, you can see how I have ripped the plastic into strips. I took all of the vent covers off and popped the lights out of their sockets. They were all broken so I didn’t pay attention to trying to keep anything intact with the wires or lighting.
All of the front rivets are out and the whole shelf is being held by the back rivets and the rivets that hold the sections together.


20130930_143210

20130930_144343
After that I did the back rivets (Rivets #2). I started with the ones that were closest to where the shelves meet and not the ones at the end. If I were to work backwards, all of the weight would be disproportionate and it would make it harder. Once you get to the the rivets near the end. You need to either have someone close to hold the shelf and guide it down. (or make sure that the path is clear and do it yourself and be prepared to frighten everyone with the loud bang that makes people run out of the house to make sure you are still alive)

20130930_131117

Oh yes… Can you see that piece of carpet dangling on the other shelf in this next picture?
That is at the joint and you will need to pull and chisel it away to get to the rivets where the shelves meet. Then, with the shelf down, the middle of those rivets with be exposed and with the weight that is being put on them with the other shelf hanging, they will be easy to break by using a hammer and chisel.

oct13-169

Next you can take out the brackets by drilling into the rivets (#3 and #4 in the picture above).

Make sure you are using a drill bit that is larger than the hole. That way you take the head off and the rivet is free. Xavier loved that he was able to do all them on his own. The only thing is that he quickly learned that even if it is hot, you need a long sleeve shirt to protect you from tiny pieces of burning metal.

oct13-168
T
his is basically the point where we stopped last year…

The only thing left up are the sections that house the air conditioners and that are not being held by brackets but by the air conditioner units themselves and we needed to find someone to empty the freon from them in order to continue. I finally found someone to do it after calling everywhere but now we just need to wait until there is a bit less snow.

Why don’t we keep them? One reason is that only one side was working. The second reason, is that they blow into the vents which we took off. They also take up a lot of space and can only be used when the bus is running. So there are no real positives in keeping them in there.

So next step:

  • Get the Freon taken out.
  • Take out the last section of vent and the units
  • Take the rest of the plywood off the floor
  • Clean up, fill the holes in the floor and put a rust treatment on the floor

Go to Top